How To Create Restore Partition In Windows 7
Need to create hidden recovery partition for Windows 7
"I am going to clean install Windows 7 in a laptop due to tons of malware and virus. And I'd like to create a hidden recovery partition for Windows 7 in the same or similar way that HP, Dell or Acer does it. It would work like this: when I restart or power on my PC and keep tapping a certain F key, there is a prompt to restore it to the backup image stored in the recovery partition, so that I could get to the cleanest state. Is there any simple way to do that?"
"I need to reset my computer to a point where I've configured a particular Windows environment now and then due to work problem. I'm just wondering if there is any information on how to create hidden system recovery partition, similar to the ones on Lenovo, Toshiba, Samsung, or Sony Vaio laptops. Then, I could get to work efficiently with that special recovery partition."
Above examples present users who want to create a hidden restore partition in different situations. Obviously, there are many other reasons prompting users to create the partition around the world. No matter what reason has been hold in your mind, you definitely curious about the way to create it, better easy and reliable, don't you?
What does Windows bring to you?
One-key recovery solution sounds quite attracting because it saves tedious steps of reinstalling. Windows does provide a way, kind of roundabout way, to revert computer to its previous system state.
In detail, you create a system image with Windows 7 Backup and Restore utility, a system rescue media would be better at the same time. You are allowed to store the image to internal hard drive, network path, and external hard drive, just the place where you can access in the process of restoring. And then, restore the image with a bootable media, usually Windows installation disc, to get to that system state.
Said method is a little bit complicated, actually. Also, some users complained that the system restore does not working in Windows 7, which makes it not a recommended way to follow. Fortunately, you have a way to create a bootable system install partition, no a system image, with just several tools.
Create system installation partition for Windows 7 in an easy way
In the first place, you need to prepare these three stuffs: a 3GB to 4GB partition at the beginning of a hard drive, Windows 7 installation disk, and your Windows 7 PC.
1. Connect both installation disc and the hard drive to your Windows 7, and make sure they can be detected.
2. Copy the entire DVD to the 3-4 GB partition, and make the partition bootable.
3. Open an elevated Command Prompt, and then run these commands.
-
x: (where x: is the 3GB to 4GB partition)
-
cd /boot
-
x:\boot\bootsect /nt60 x:
4. A message should appear: Boot code was successfully updated on all target volumes. You can exit the command prompt and check if the partition is marked as Active in Disk Management. If not, you may need to right click on the partition and select "Mark Partition as Active" to do it manually.
5. Restart your PC and it will launch the installer from the partition and add an entry in Windows setup automatically. If not, you may need to edit the boot menu with EasyBCD.
The way is quite simple but may not the exact thing most users want, i.e. create hidden restore partition. In that case, turning to professional one-key recovery software is a wise move.
How to create hidden partition for one-key recovery in Windows 7 easily?
AOMEI OneKey Recovery Professional is mighty and reliable utility that allows you to create a hidden recovery partition in Windows 7 on HP, Dell, Lenovo, Toshiba, Samsung computers etc., regardless of the brand.
It provides an easy way to help you create the hidden system recovery partition on current internal disk or external drive. The recovery partition would contain the system you're using right now. The restore is fairly simple, restart or turn on the PC, keep tapping F11 or A key to access the partition, confirm the operating and then start to restore. Let's get to know how to make a hidden recovery partition for Windows 7 in specific steps.
Create hidden and bootable recovery partition | step-by-step guide
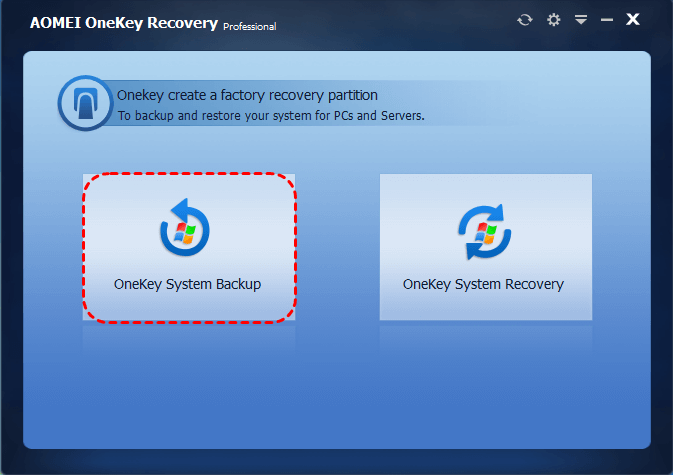
1. Install and run AOMEI OneKey Recovery Professional. Click OneKey System Backup in the left side.
2. Two methods are available at this step. Choose the first one to backup system to AOMEI OneKey Recovery Partition stored on internal system disk. Choose the second one if you'd like to create recovery partition on external drive. Here will take the first method, the recommended one, for example.
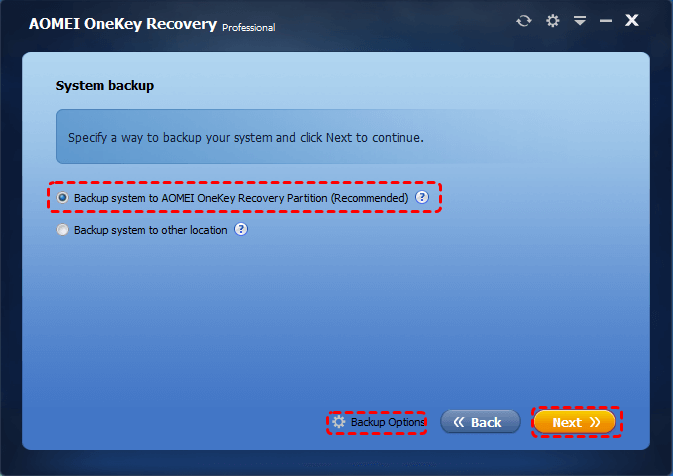
You can set compress level and password encryption for your backup image by clicking Backup Options.
3. Select one redundant partition from your existing ones for AOMEI OneKey Recovery will create the recovery partition there. Click Start Backup to execute.

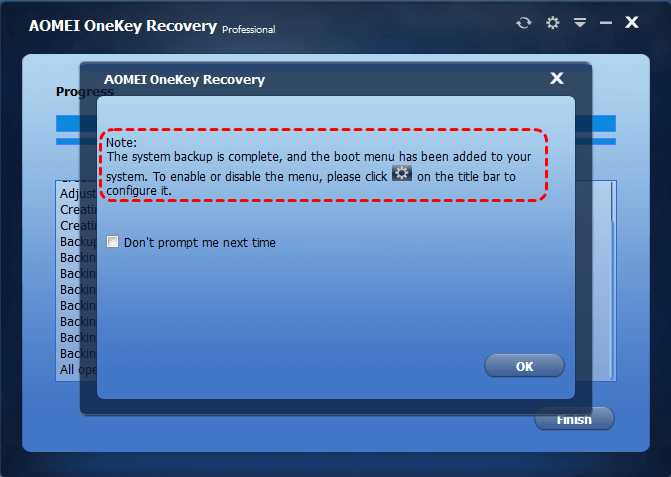
4. The recovery partition contains your system backup image and AOMEI OneKey Recovery bootable environment. Wait for the process completes. You can enable or disable the boot menu.
Tips:
-
AOMEI OneKey Recovery will automatically create the hidden recovery partition on unallocated space if there is and the space is sufficient, so you can also create an empty partition in advance.
-
You can click the setting icon on the toolbar to configure boot menu. It allows you to enable or disable the boot menu and hide or display the message by tick or un-tick the checkbox, and change the residence time on the boot menu.
-
To create customized recovery partition for company and enterprise, please turn to AOMEI OneKey Recovery Customized edition, supporting Windows Server OS as well.
-
Above steps apply to create hidden recovery partition for Windows 10, and Windows 8/8.1/ XP/Vista as well, both 32 bit and 64 bit.
Restore hidden system recovery partition easily
As covered, the way to restore the bootable hidden recovery partition is simple as well. You can try following steps to return things to normal in the matter of system crash, boot failure, or your PC run into a problem loop, or for other purposes.
1. Power on your computer and keep tapping F11 key (default) or A key. Then, it will boot into WinPE recovery environment.
-
For computer boots with BIOS mode (MBR disk), a message "Press A for AOMEI OneKey Recovery……" should appear.

-
For computer boots with EFI/UEFI mode (GPT disk), you'll find a pane named AOMEI OneKey Recovery come into sight directly. Press A or click the pane to continue.

2. Confirm operation by clicking Yes and click OneKey System Recovery to continue.
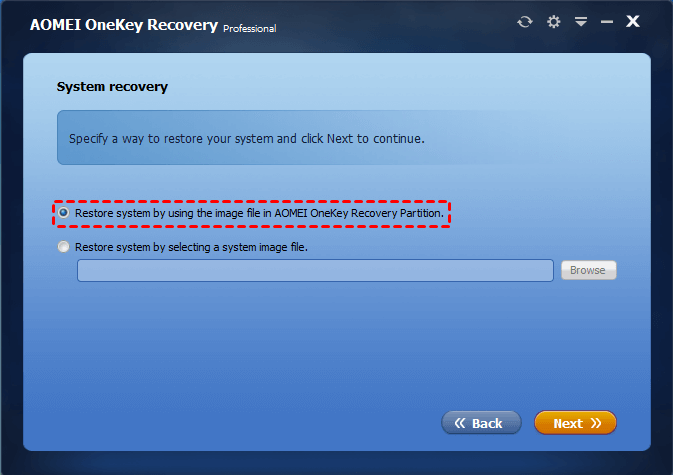
3. You have choices to restore with the system image in AOMEI OneKey Recovery partition or in another path. Here chooses the first one.
4. At the "Restore and Confirm" step, confirm the partitions (in green) you are going to restore to. Click Start Restore to begin. The process will be completed in reboot mode and may take some time. Wait patiently and restart your PC when it is done.
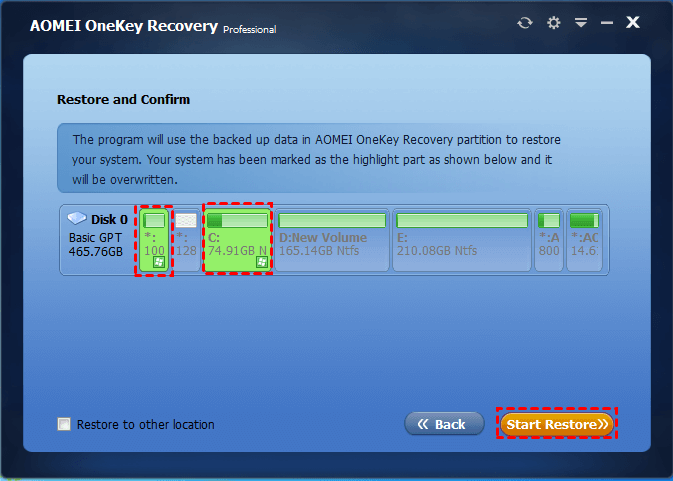
Tips: you can restore to a different location by ticking the option "Restore to other location" in the lower-left side.
Summary
Now you see how to create hidden recovery partition in Windows 7 and how to restore the bootable partition to fix issues in different ways. Choose the most suitable one based on your situation.
AOMEI OneKey Recovery software does a lot help in restoring computer to normal for users all over the world, and earns its own reputation due to easy-to-use interface and professional recovery technology. Go for it and protect your computer now.
How To Create Restore Partition In Windows 7
Source: https://www.ubackup.com/okr/create-hidden-recovery-partition-windows-7-3889.html
Posted by: jolleycapecontabir.blogspot.com

0 Response to "How To Create Restore Partition In Windows 7"
Post a Comment